Wednesday, March 14, 2012

Fireplace Renovation

When we did our house renovation we knew that we had to address our fireplace.  We love having a fireplace - even in South Florida (I know, I know - we don't get to use it very often, but when we do, it's wonderful to have!).  However, the fireplace in the house was not something to write home about.  Would you like to see what I mean? 


Isn't this thing beautiful?  Not. 

Before we go any further I want to apologize right up front for the quality of some of these pictures.  Some are pictures of pictures (remember me telling you about not having the original pictures of the house on my computer?) and there are a lot of pictures.  However, I have to show you the progression of the project.  So, please forgive the quality and the amount of pictures you are about to see. 

Now, back to the fireplace - it get worse -


See the angled walls - right in front of the fireplace is an area that was the original dining room and the kitchen is to the right - pool is through the sliding glass door to the left.

Now you can see the kitchen a little better (I'll do a post on the kitchen at a later date).  This was the house when the Mountain Man and I moved in - and the location made it practically useless.


This was just before the remodeling project began - haven't pack everything up yet but you can see all the angles around the fireplace.

Let the project begin --------

Day One of the project - master bedroom in the back.  All the walls are gone and MM has removed all the stone from the fireplace.

While all that ugly stone is gone - we still have the problem of ANGLES!  They have to go!  So, Mountain Man tore all the mesh off the face of the fireplace and then we drywalled with squared-up walls.


 Some people have asked us if we moved the fireplace.  We did not, but by making all the walls straight and square it looks like we did.


The Mountain Man at work!


This is the house during the middle part of the renovation project - a little bit of a mess huh?  Such fun to live in!!!!


Okay- floor has been installed, tile around the fireplace, and walls have been painted.  Now, it's time to finish up the fireplace!


Still a work in progress.


More detail of the wood working as MM progressed.


First shelf installed and the surround is pretty much complete.


First coat of paint.


A few days later and - Yahoo! 
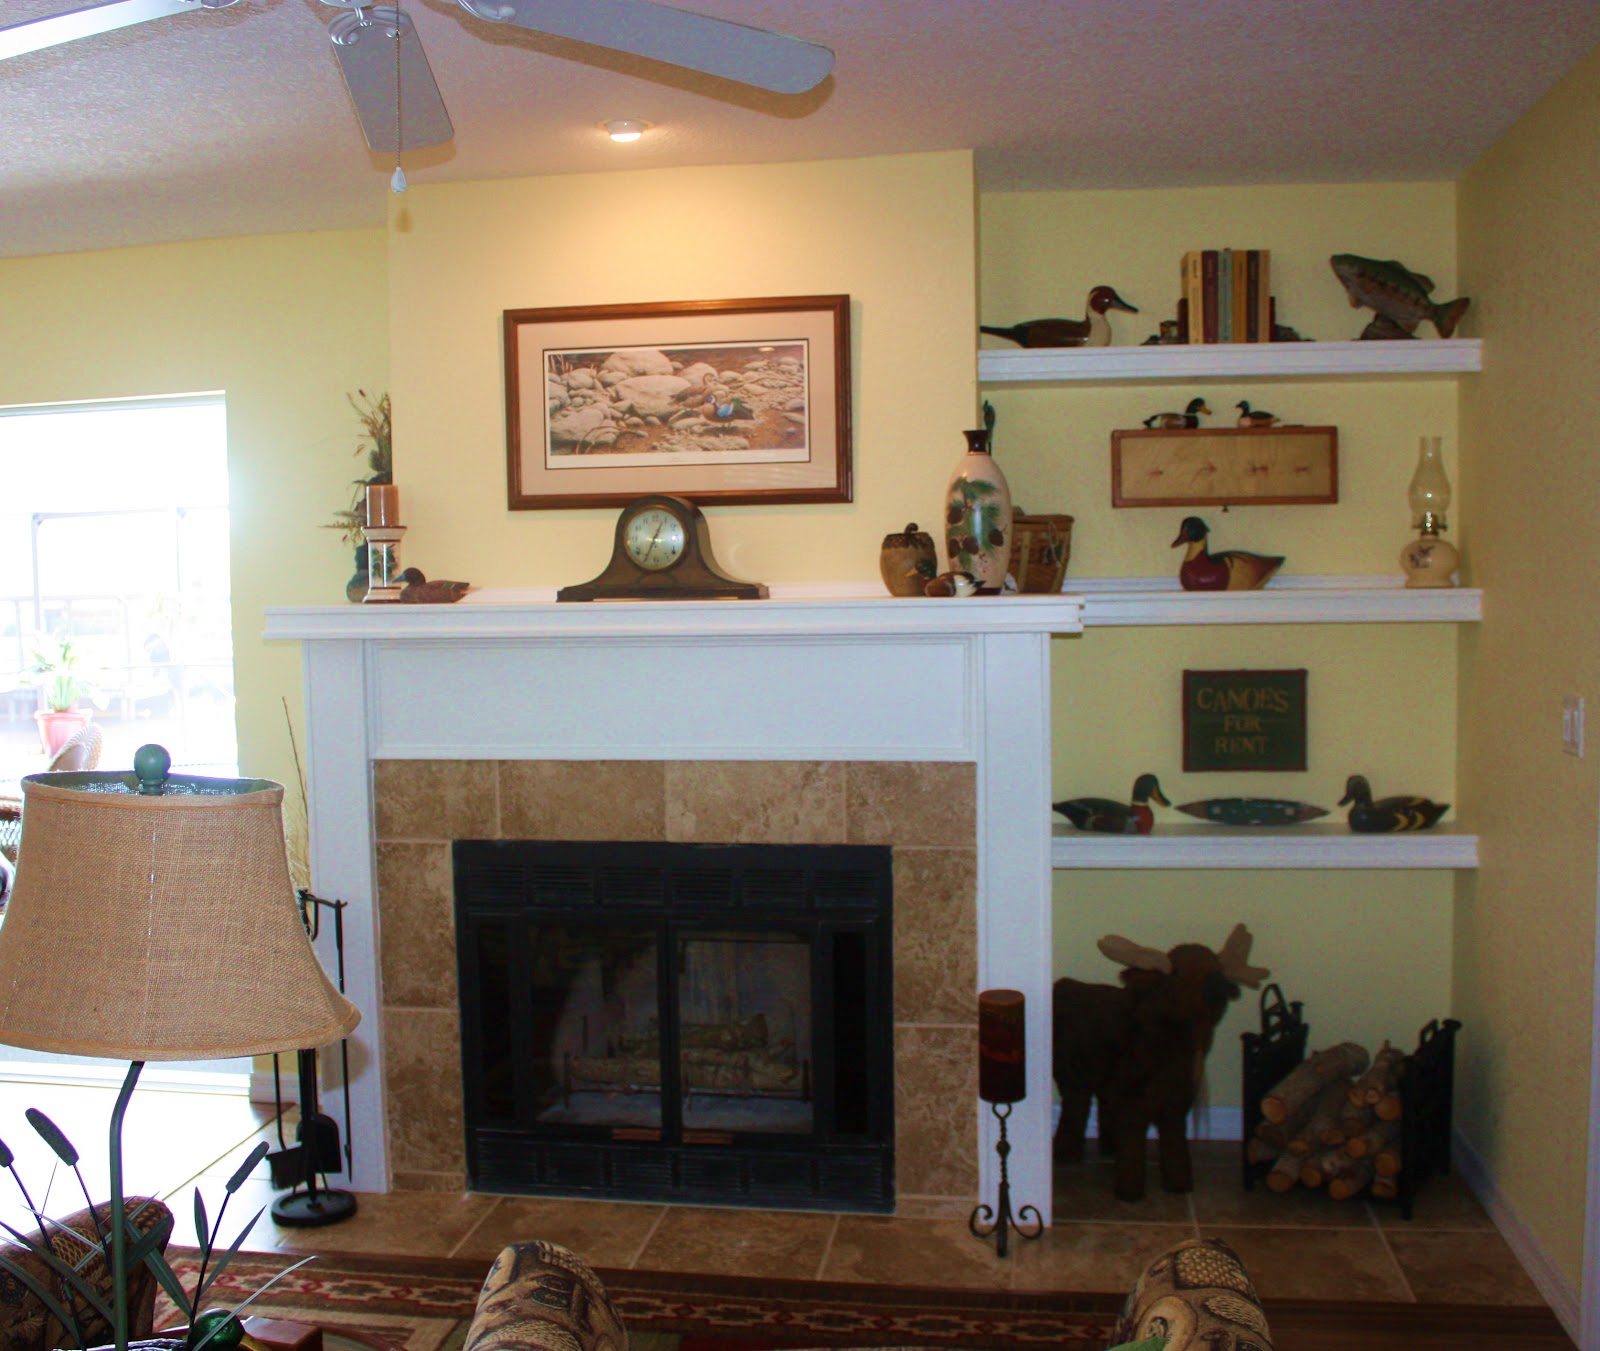
It's done!


By squaring up the walls we had enough room to add these decorative shelves.  I'll tell you - this was not the original plan - we had thought that we were going to put a closed cabinet with a couple of shelves above - but after thinking about it we thought it would be heavy.  So, we decided just to have the open shelving instead.


This is our seating area in front of the fireplace.  No longer is this space wasted - it is a wonderful place to sit, enjoy the fire, and read.  The chairs swivel and rock so they are very comfortable - you can even swivel around and watch TV in the great room.

I love our new fireplace area and I think there is a huge difference from


                                                        this


to


this.

What do you think?  Do you think we made good decisions in this area?
Would love to hear your opinion - so drop me a "line" in the comments, but PLEASE remember to 'play' nice.

Thanks!

Hugs!

Carol 

P.S. 
I think that I have removed the comment verification from my blog.  If someone would leave me a comment and let me know if, in fact, I have removed this pain in my side I would GREATLY appreciate it!
Thanks!!!!

I'm linking to:
                                                                        http://www.thegunnysack.com/2012/03/whats-in-gunny-sack-link-party-29.html
                                                                     http://kristenscreationsonline.blogspot.com/2012/03/share-your-creations-party-29.html
                                                                     http://blackberryvine.blogspot.com/2012/03/tuesday-to-do-53-and-52-list-makers.html
                                                                       http://www.homestoriesatoz.com/2012/03/tutorials-tips-link-party-51.html

Monday, March 12, 2012

Menu Monday

This week has been a blur!  I don't really know where the week went - but all of a sudden it's another week!  Good grief - we are almost half way through the month of March already! 

I wrote last week that IF I didn't fix the Easy Taco Soup on Thursday night that it would come off the menu list FOREVER.  Well, guess what -


                                        This is Easy Taco Soup!

Yahoo!  I actually fixed it and it was good and easy.  I chopped, cooked and served it in 45 minutes.  (I will admit that the hamburger I used was already cooked and was out of the freezer)  However, it was till quick and easy to fix.

If you are interested - here is the recipe:

                                              Easy Taco Soup

                    1 pound ground beef
                    1 onion, chopped
                    1-1/2 cup water
                    1  15oz. can corn (drained)
                    3  15oz. cans Mexican Chili Beans
                    1  15oz can tomato sauce
                    1  14oz. can diced tomatoes (I used Rotel)
                    1    4oz. can chopped green chilies (optional - I didn't use)
                    1  pkg. taco seasoning mix

      Garnish:  shredded lettuce, chopped tomato, shredded cheddar cheese, sour cream.

                 Place ground beef and onion in a Dutch oven over medium heat.  Cook until beef is browned and onion is tender, stirring to break up meat.  Drain.  Stir in remaining ingredients except garnish; bring to a boil.  Reduce heat and simmer, uncovered, for 15 minutes, stirring occasionally.  Spoon soup into bowls; top with desired toppings.

      Serves 6 to 8

               I served it with tortilla chips - shredded cheese and the sour cream.

YUMMY!!!  Mountain Man even said that it was a keeper (after his avoidance tactics for the last couple of months that was a testimony in itself!) Also, I'll confess a little secret - I forgot the Taco Seasoning Mix - and it was still good! Give it a try - I think you might like it!

Okay, let us move on to this week and see what is on the menu.

                     Monday, March 12 - Grilled Chicken, Corn of the Cob, Cole Slaw
                    Tuesday, March 13 - Pepper Steak w/ rice, Rolls
               Wednesday, March 14 - Black Beans & rice w/Smoked Sausage
                  Thursday, March 15 -  Chicken Enchilada Casserole
                      Friday, March 16 - MOVIE NIGHT, Pizza
                  Saturday, March 17 -  HAPPY ST. PATRICK'S DAY - Chef's Choice
                    Sunday, March 18 - Chili/Cheese Hot Dogs, Tator Tots

I hope that you have a great week and I hope that you will come back and visit on Wednesday - I've got another GREAT room reveal!

Have a great week and I'll "see" you Wednesday!

                                               Hugs -

                                                                  Carol


I'm linking to:

http://orgjunkie.com/2012/03/menu-plan-monday-march-1212.html

Friday, March 9, 2012

Out in the "Outback"

I know that I usually have a post on crafting on Friday's however I am still working on things for Melissa and Loralie's shower - so I can't share the stuff with you just yet.  So, I thought I would share the little trip that Mountain Man and I took last week.

I know that you didn't know we were able to sneak away for three wonderful, glorious days last week.  We loaded the two pups into the truck - threw some groceries in the camper and headed down to The Keys - Bahia Honda State Park to be exact.  We were really very lucky Monday to be able to reserve a camping spot right on the water for three days at the last minute.  In fact, we got the last available spot in all of the Keys - at least at a state park.  So Tuesday morning we left and were back home Friday afternoon.

Now, let me back track just a little.  In October of last year - the Mountain Man and I bought a new to us camper - a 23 foot long Outback travel trailer.


As you can see from the picture above the back of the travel trailer slides out -  that is a queen size bed in the slide out, plus there is a queen bed and a twin bunk bed in the front.  I think that it will make more sense if you see pictures of the interior - so here are a few pictures of the interior.


Looking from the door to the back.


The front queen bed and bunk - also taken from the door.


Full bath.


Taken from the back looking toward the front.

Now, as you can plainly see we have a wonderful, beautiful camper - that we had not used at all.  Why?  Well, right after we purchased the camper, MM went into the hospital for his first heart catherization.  Then he couldn't lift anything over five pounds - which meant we could not hook the camper up to the truck since the hitch weighs more than five pounds.  Just about the time that he thought he was back to fighting form - he had his second cath and we were back to square one. 

Then, of course, we had Thanksgiving and Christmas in this time frame also.  It just seemed like things were going against our getting away.  You know how that is - something always coming up.  Finally, last week, we just decided that we were going somewhere - and it didn't really matter were.  That's when I went to the Reserve America website and booked our three day trip.


Mountain Man watching the sunset on our first night at the camp site.


Sunset over the water


                                             Pretty nice, huh? 

This was the view right outside our door.  It was the best three days.  We just slept and ate and took it easy - I even took naps!  It was so nice to be able to just sit back and not have to worry about anything!  We never left the campground, which is really different for us.  We usually spend at least one day out when we are camping, site seeing, but we just decided not to leave the campground.  We didn't even go into Key West, which was only thirty minutes away.  Oh well, maybe next time.

Now, there was one thing that we saw that neither one of us had ever seen in the wild before.


For those of you that don't know - this is a manatee, or as some people call them - a sea cow.  These are the most amazing animals.  A lot of people can see them at power plants because manatees like warm water.  They are also found in the springs here in Florida.


 This guy was HUGE!   This picture really does not do him/her justice (I don't know what sex it was, but that really isn't important).   To make it even more special - there were actually two of them.


Aren't they amazing???

Mountain Man actually gave them a drink of fresh water - which was really pretty cool.


                                                  Neat huh?

I have a couple of other pictures I would like to share with you - I usually have some great pictures of Samantha Ann - she likes to pose and I am able to get good pictures of her. 


 However, I never seem to get any good pictures of Jessie Lee.   For some reason, Jessie doesn't like to have her picture taken.  Her ears are always down and back - not a pretty picture. 


Well, I finally was able to get some good pictures of Jessie and I want to share -


                                                                   Much better! 
                           Isn't she cute?  What has her attention?

                I'll give you a hint - there is only one thing that would
                           capture her attention like this.   Give up? 


                                                                             FOOD!

                                Hope everyone has a great weekend! 

                                "See" you Monday for Monday Menu!

                                                       Hugs!
                                                       Carol


I'm linking to:
http://www.theviewfromrighthere.com/blog/?p=6603

Wednesday, March 7, 2012

Master Bedroom Closet

Last week I promised to share the Master Bedroom Closet with you -


Do you remember these pictures?


The master bedroom closet before we bought the house - the closet facing the camera turned out to be MM's and the one on the left was mine.  Why?  Well, the one facing us had two "poles" and the other one only had one - MM thought it would be better to have the one with two since he could hang his shirts on one pole and his pants on the other - and since I had dresses I needed the single pole closet.  Makes sense.


So this turned out to be "my" closet.  Remember, this picture was taken the day before the remodeling project began - If you would like to see the after pictures of the bathroom remodel, please click here .

When we first started talking about the remodeling project the Mountain Man and I sat down and made a list of things that we wanted in the new closet and things that we did NOT want.  Here is that list.

Things we wanted:
1. A walk-in closet
2. Separate areas for MM's stuff and mine
3. Shelving that is separate from the rod/shelf that the clothes hang on
4. Baskets - maybe wire pull outs
5. The door to the closet should be in the bathroom, not the bedroom

Things we did NOT want:
1. Mirrored doors (I'm telling you, with these doors along with the wall of mirror over the vanity, I saw parts of my body that no one over the age of, say 20, should ever see!  LOL)
2. Sliding doors

By the time the construction began we had agreed on having a walk-in closet, the size of the closet, and where the closet was going to be located.  We actually were able to make the closet a little bigger by making some changes in the laundry room - I'll show you that in a future post.


This was the first day of demolition.  The light aqua blue area on the floor above is where the old closets had been located.  You can really see how they were angled.


By day four we were starting to put the walls back up and the decisions were made on the laundry room - so the closet could be bigger.


Four weeks into the project we finally had drywall.  If you look on the floor and and ceiling you can see where the angles were and you might get a little perspective of the location of the closet.  One of the important things here is - NO ANGLED WALLS!!!!

It took about three weeks after we moved back into the house for the Mountain Man and I to finish up the closet, but I am so happy with the ways things turned out.  We have everything that was on our wish list except one thing.

This is the view as you look into the closet from the bathroom.  Yes, the closet opens into the master bathroom by a bi-fold door. (No mirrors and no sliding doors)

Right in front of you are the shelves that I use.  To the left is the MM's single rod/shelf and on the right is my double rod/shelf.  Now, why did we switch since MM had the double in the old closets?  Well, he decided that since he is so tall (6'4") that his shirts usually drag on the rod/shelf if he hangs them on the top or drags on the floor if he hangs them on the bottom - so, he decided that he would only use a single rod/shelf on his side.  I decided that since my shirts and pants/Capri's/shorts were shorter (and to give me more room) I would have a double rod.  So how about my dresses - well, we worked that out too!

Now, as you can tell, this is MM's side of the closet.  While I try to keep his clothes in an organized manner - sometimes you just have to let things go - if he can live with it I guess I can too.  He does have all his short sleeved shirts together and then his dress shirts are down at the far end of the closet - since he only wears those for church.  Also, if you look under his clothes you will see that we have extended the wall unit - so, if we want to add another rod/shelf all we have to do is buy the shelf/rod and brackets.  Not a big deal, and not very expensive!

In the corner closest to the door MM has his shelves.  Here he keeps his T-Shirts that he doesn't wear very often (usually those with writing on them - he is not crazy about those kind of shirts) and the baskets and boxes for all his miscellaneous stuff.  BTW, don't let a guy tell you they don't have "stuff" - they do, and a lot of it!
You can sure tell these photos were not staged - yep, those are MM "sleeping shorts" folded up on top of his basket.  Hey, at least they are folded and not just thrown in there!


Now, we can move over to MY side of the closet.
First of all - the bottom rod is divided by type of pant - slacks, jeans, Capri's, shorts, and then by color.  The slacks are at the far end of the closet since they are my church/work clothes - while my shorts and Capri's are closest to the door - easier to get too. 
(Oh, my shoes are also arranged by type and color.  Sorry, I guess it is my OCD coming through!)


My shirts are divided the same way - I guess they really go from the center out.  If you are looking at the center of my side of the closet - to the left are my church/work blouses arranged by sleeve length and color - to the right are my everyday shirts, also arranged by sleeve length and color.  At the far end we left about a two foot section where the bottom rod/shelf does not extend.  This is where I can hang my dresses and suits. (Yes, they are by dress length and color - sorry!  I'm just funny that way.)


On my shelves - I have baskets, my jewelry box, and my camera bag along with the change "crock".  The baskets hide all those little things like scarves, belts, and hose.


On one of the shelves, in front of a basket, I have this little trinket box.  It was given to me by my Secret Sister at church, and it is just a little reminder to me everyday.

Well, I hope you have enjoyed this little tour of the master bedroom closet.  We are so happy that we were able to get everything in this closet except one thing - we don't have the pull-out wire baskets - but I think what we have is working very well for us, and we can always add them where we have the shelving if we need to add them.

I would love to know what you think of the transformation, so don't be bashful - leave a comment!

Hugs!
Carol


I'm linking up to:

http://betweennapsontheporch.blogspot.com/2012/03/ikea-expedit-closet-makeover-welcome-to.html
http://www.thegunnysack.com/2012/03/whats-in-gunny-sack-28-bloggy-birthday.html

Monday, March 5, 2012

Monday's Menu


Hello everyone!  I hope that you all had a fabulous weekend - I know that MM and I had a great week last week and were very busy this past weekend helping my daughter and sil paint the nursery and start getting ready for the new baby.  This is such an exciting time for all of us - and to tell the truth, I'm really enjoying helping with the nursery! (All the pictures and an explanation of what we are doing will be posted in the future - I just want everything done so you will be able to see the great room we are creating for Lorelia!)

Now, on to the real reason for this post - the menu plan!  Well, we did NOT do real well staying on target last week, but I had a really good reason why.  We went camping (finally!) and it was WONDERFUL


This is our camping spot down in the Keys - doesn't MM look comfortable?
We really lucked out with our last minute reservations - usually you can't get a spot right on the water, but I called the Reservation Line for Florida State Parks on Monday and made our reservations for three days - starting on Tuesday night!  We were at Bahia Honda State Park and it was the best three days EVER!  We didn't do anything except relax, eat and sleep - and MM did most of the cooking outside - which is even better! 

However, we did vary from the menu plan as we had grilled Hamburgers and Country Ribs (along with corn on the cob and baked potatoes). Now, that does not mean that I busted the budget - all the food we took with us was from our freezer.  So, while it may not have been "on the menu plan" for last week,  I had everything in house - so NO trip to the grocery store!  Plus, there were so many left-overs that those two items were all we needed for the three days - and we even brought home hamburgers for lunch at home!  I'll do a post on the trip later in the week, but just know that we saw some wonderful wildlife that I have some neat pictures of!

So, what about this week?  Well, I'm determined to get back on the plan this week, since we are back home!  I'll also get all the figures ready from the budget to see how we did over all last month and what I have planned for this month.  (Yes, if you are looking at the picture above - it is the February calendar - but IF you look closely you will see that  the first week and a half of March is at the bottom.  Don't worry, I'll have the March calendar next week!)

 
Now, here is the plan for this week:

Monday, March 5 - Chicken Salad
Tuesday, March 6 - Waffles & Bacon
Wednesday, March 7 - Easy Pork Chops & Potato Dinner
Thursday, March 8 - Easy Taco Soup
Friday, March 9 - MOVIE NIGHT - Homemade Pizza
Saturday, March 10 - Birthday dinner out
Sunday, March 11 - Grilled Chicken

As you know, MM does not seem to like the idea of "Taco Soup", since every time I have TRIED to fix Taco Soup  he comes up with some excuse for me NOT to fix it - but I'm going to try this one more time. IF he comes up with an excuse not to eat the soup this Thursday - well, it will be taken permanently off the menu options.  Sometimes you have to do what you have to do.  Just remember - it doesn't matter how good something is (or economical) - if your family won't eat it - then you just need to let it go and move on to something else!

So, how did you do last week with your menu plan?  Did you stay with the plan or stray some?  What's on for this week?  I'd love to know, so leave me a comment so I know if I'm not the only one who has to come up with something else when the plan doesn't meet with the family function.

Take care and I'll "see" you soon!
Hugs-

Carol

Friday, March 2, 2012

My Little Grocery List Project

Before Christmas I saw the cutest little project for a grocery list using a picture frame and scrapbook paper.  I thought to myself - "I can do that!"  So, after several trips to the local thrift store (we don't have a Goodwill store in our little town, but we do have two not for profit thrift stores that I like to donate to and "shop" at), I found the perfect picture frame to use.

I brought the frame home and spray painted the frame white since all the trim work in our kitchen is in white.  Then MM cut a piece of luane board to fit the frame and painted it white also.  I brought the glass in the house and used my glass etching creme and stencils to put "GROCERY LIST" on the glass.  When we put the glass in the frame and then put the back on - the etching did not show up.  MM thought if we (he) painted the top 1/3 of the back board black the etching would show up.  So we did that and I hung the frame up in the kitchen. 

By using a Vis-A-Vie water soluble marker I can write the my list on the glass and then, after I buy groceries, all I have to do is wipe the glass with a wet paper towel and it's all clean again.  Well, I LOVED the ease of using the list - but I did not like the fact that you could not see the glass etching.  It just looked like a picture frame with a white and black board in the back - not exactly the look I was going for.

See it hanging there on the wall between the pantry and the laundry room door?  Just looks a little funny doesn't it?  Well, I knew that I had to do  something to fix that!

I thought about this, and thought.  What could I use to "fix" it.  You might say, Why didn't you take the back off and put scrapbooking paper on the top.  Well, I thought about that, but MM thought he would do me a favor when he put the back on he would GLUE it on as well as nail it!  There was no way to take the back off with tearing up the frame.   

So, what to do.  How about - STICKERS?  Yep, good ole scrap booking stickers!  I found some stickers in my scrap booking stash that had some flowers on them with the colors that are in the valance over the window and I found some letters that I thought would work - so I thought, "Why not?  Let's try them!"  I knew that if they didn't work out - I could always scrape them off and it wouldn't be any worse than it originally was. 

                                                       Ta Daa!


Now, I didn't want everything to look real "formal", so I made sure the letters were not arranged straight - so, it's not a mistake - I'm too OCD for that! ;-).


If you look closely in these few pictures you can see the etching -

but you have to look real close!

Oh yes, there are the etched letters!  Just not very easy to see.  However, the stickers are perfect!  They give some color and can be seen - so it's not just a "thing" hanging on the wall!

I keep the Vis-A-Vie on top of the frame - it's easy to grab and it doesn't fall off!  You could always add some Velcro to hold it, but I don't find it necessary.

I really like my little Grocery List board.  It didn't turn out as I had originally planned, but that's okay.  Sometimes the best things in life aren't planned.

What do you think of my little board? Do you think I made Lemonade out of lemons, or do you think it's still a lemon?  Come on - you know you want to tell me - but let's play nice please!

Have a great weekend everyone!  I'll "see" you Monday with Monday Menu's!

Hugs!

Carol

I'm linking up to:

                               http://soverycreative.blogspot.com/2012/03/so-creative-party-time-28.html

Where does time go?

I have really fallen off the blogging wagon I guess.  I can't seem to get a schedule down so I don't post - but it's been almost...