Let's look at some before pictures -
Before we actually get started, let me apologize for the quality of these pictures. Actually, these are pictures of pictures. You see, when I flew down from Alaska to look at the house I needed to take pictures and send them to the hubby who was still in Alaska working - and I didn't have my computer with me. So, I took the pictures, put them on my daughter's computer, sent them to Walmart photo and had them printed in Juno, Alaska. MM picked the pictures up two hours later. Anyway, in the last two years my daughter's computer has crashed and I don't have access to the disc drive with the "real" before pictures. So, I have to take pictures of the Juno pictures for you to see what it really looked like. All this said, let's see what the bathroom was like.

Hello, ugly gray vanity!
Really, who would put a gray vanity in a house, especially with the shower tile that is coming up. You really won't believe the combination!

This is looking back towards the bedroom.
Can you tell that the closet wall is at an angle?

Another angle coming together. Through this door to the left is the shower and the toilet. Completely closed off and DARK! (Scary!)

Pretty bad, huh?
Remember, I told you that ALL the walls in the house were angled and the bathroom was no exception. The two closets came together at an angle here and in the picture above.

Here is a picture of the tile I was talking about!
Really, who in their right mind would put that tile with a gray vanity and the wallpaper?????
The only good thing about this bathroom was the size - it was large and I loved the size of the shower.
Can you see why my daughter told everyone that her parents had bought the "UGLY" house?

Packing things up for the move out of the house.

Mirrors, Mirrors, everywhere!
There were so many mirrors in this place - I saw things and parts of my body that I really did NOT want to see! LOL!!
Day One of Construction - Demo

If you look on the floor above I think you will see where the angled walls were a little better. These were the closet walls.
The door on the left was a very small (angled) linen closet. You could not even get a folded towel in this closet!
Day Two:
All the walls are down - the UGLY gray vanity is gone along with that terrible 1980's vanity light!

Ugly tile in shower GONE!
Day Three:
Walls are going back up!
And they are all STRAIGHT!

No more door separating the shower and toilet area from the rest of the bathroom area. However, I still don't want the toilet just sticking out there - so we had a half wall installed. There will still be the open feeling but a little bit of privacy also.

This shot shows that the bathroom area backs up to the laundry room (which went through more changes after this picture was taken).
Fast forward to Week Three:

Drywall is finally installed, but there is still a long way to go!
Six weeks into the project and we have tile in the shower and on the floor, the walls are painted, and the new vanity is in the room - but not hooked up. ( I'll explain about the vanity a little later.)

Eight weeks into the project we were able to move back into the house because we finally had a working bathroom!
Yahoo!!

Today, we have a completely different bathroom.


No more gray vanity or ugly 80's lighting.


A little decoration to help with the privacy in the toilet area.
Okay, let's talk about the vanity a minute. I have always dreamed of having a chest converted to a vanity for a bathroom, but I always thought it would be in a half bath and it would be a small chest of drawers.
When Dan and I were looking for furnishings for the house during the remodel we went to a home decorating store called 'The Barn' in Lake Alfred, FL. They have three different buildings that house different types of furnishings.
The first building we always go into is the Antiques building. The owners of the complex go to Europe every summer and buy antiques and ship them back to the US and we have found some nice things here in the past.
On this particular day, right inside the door, we found this beauty.

Check out the detailing.

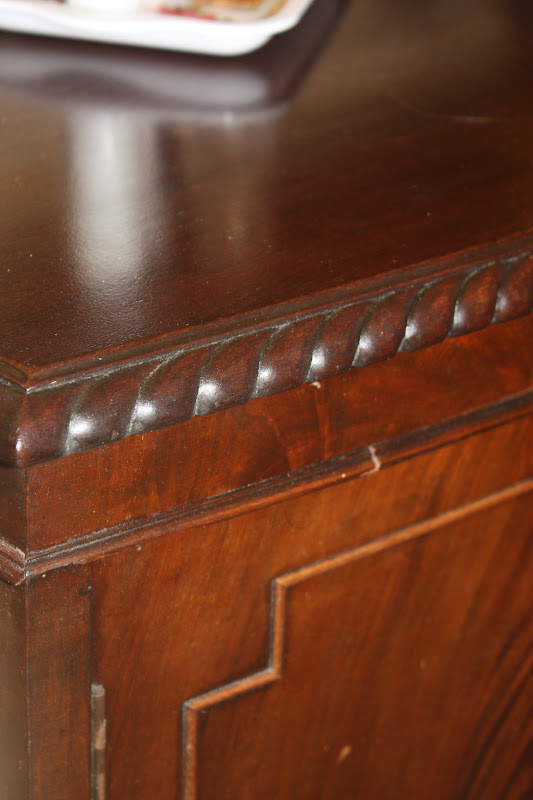

It was everything I thought I wanted plus some. It had already been converted, all we had to do was add the plumbing fixture and hook it up. Then to make it even better - it only cost $645.00! About half of what a ready made vanity would have cost.
Some people have asked about going from a double vanity to a single - but it doesn't bother us, and IF a future owner of the house ever wants to go back to a double vanity - we left the plumbing in the wall - so it would not be a major reno for them to go back (but I don't know why they would EVER want to do that!)

I am extremely happy with the master bathroom. What do you think of the difference between this


and this?
I would love to know what you think of our new master bathroom - leave me a comment. It will be interesting to see your take on the changes.
Next week I'll share the master bedroom closet and the linen closet- they went through quite a transformation also!
This post was featured on:


Linking up to:
http://www.theshabbycreekcottage.com/2012/03/how-to-make-hanging-starfish.html
http://funkyjunkinteriors.blogspot.com/2012/03/sat-nite-special-127-full-room-reveals.html
http://www.houseofhepworths.com/2012/03/28/hookin-up-with-hoh-93/
http://littleinspiration.com/2012/03/create-inspire-party-features-4.html
http://thriftydecorchick.blogspot.com/2012/04/april-before-and-after-party.html